
There’s something so fresh and beautiful about window planter boxes in full bloom. That’s why today we’re showing you how to build a planter box yourself in a few, quick steps so you can decorate your home in all the flowers this spring!


This is a pretty straightforward DIY on how to build a planter box, great for beginner or advanced builders. (Each box takes about 20 minutes to build, start to finish.)
3 – 1×8 cedar boards, cut to the desired length (for example, the width of your window)2 – 1×6 cedar boards, cut to 7-1/16” (the true width of a 1×8 board)2” exterior decking screws
(P.S: Even if you’ve never built anything before, we think you can do this one! Of course, you could just start off by building one of these planter boxes or could go for a whole collection of them. Once completed, you’ll love adding flowers of various colors to create stunning displays in your new wood planter box.)

Prepare all the materials you’ll need in building your very own wooden planter boxes.
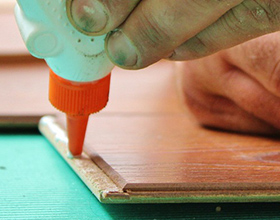
For this project, we’re going to make arectangular planter box and the first thing you need to do is to attach the corners of the front board to the bottom board.
Cedar planks come with one side smoother than the other.
Out of your three window-width-cut boards, choose the one you want on the front of your planting box and hold it upright.
Lay another board, smooth-side-down, next to this one to form an “L” shape.
Check for alignment on both ends. At the bottom of your box-front board (and, thus, through the side of the bottom board), predrill about 2” in from the board end.
Put in a screw.
Do the same on the other end.

Secure front and bottom board attachment with more screws.
Flip the L-shaped boards over (to form a tent) and continue screwing the two boards together. Place a screw about every 6”-8” apart.
Pro Tip: Cedar is very prone to splitting, so you can predrill these if you’d like.

Attach back plank.
Repeat these steps to attach the back plank to your bottom board.
Because the interior face of the back plank is the one that will be seen in your window box planter (the top few inches, anyway), make sure the smooth side is facing the inside of the plant box.
In other words, the smooth faces of both your front and back boards should face the same direction.
Predrill and insert the two corner screws of your back plank, then complete the attachment with additional screws.
Pro Tip: Cedar planks can be slightly warped; check for plumb and hold securely in place while you screw to force the plank in place.
Would you believe you’re almost done? Because you are. Nice work.

Position the sides.
Position a 1×6 side piece where you want it in your wood box planter.
This example shows the sides inset about ½”.

Attach side piece to bottom of the planter box.
Holding the side piece in place, predrill then screw through the bottom plank into the side piece.
If your cedar is a bit warped, this will help to pull things more squarely into place before you attach the sides.

Secure sides completely.
Predrill, then screw into the holes to attach the side piece to the front and back of the boards.
Pro Tip: Pre-drilling is almost always necessary for preventing or minimizing splitting the wood when you’re working closely to the end of a plank.

Step back and give yourself a high five.
Of course, you can stain, paint, and/or seal the boxes at this point.
Although cedar is a great exterior wood in and of itself, it will grey more quickly without protection.
To hang the boxes, screw two L brackets into your house’s framing studs under the window, checking for level often, and then screw the bottom of the box to the bottom of the L brackets.
Now the fun begins with adding your flowers to the window box planter.
Once you’ve made your desired number of planters, get your flowers ready to create beautiful floral displays to brighten up your home.
If you have children, this is a great time to get them involved in the fun, and you can even designate one planter for each child to create their own unique display.
Window box planters can be changed each season, and it’s an easy way to keep up with the colors for different times of the year.
I hope you enjoy building your own window planter boxes!
There are a few different ways to hang window planter boxes without drilling, and it’s important to consider your situation when figuring out which route is right for you.
First, if you have a window with vinyl siding, consider purchasing vinyl siding hangers for a window planter box. These can be found online and in many home improvement stores. They don’t require drilling and attach securely to the side of your house, but they will only work on homes with vinyl siding.
If you have a different type of window covering, another option is to purchase some no-drill window flower planter boxes. These are sold online and in most home improvement or gardening stores and come in different lengths and materials. You can also purchase an over-the-window bracket separately and use that to hang your no-drill window planter box.
If neither of those options works for you, there are other ways to go about getting your hands dirty. Consider planting your garden on a balcony or near a ledge instead of sticking with an outdoor planter box.
An easy way to attach a window box to a vinyl siding is by using vinyl siding hangers forwindow planter boxes. But if you’re someone who prefers something that requires a little bit of effort, you can simply follow the steps below:
Using a stud finder, locate the studs through your vinyl siding. Mark the location of the studs and start drilling pilot holes at least 3 inches away from the marked spots. Drill holes in your window plant box, making sure that the holes in it are aligned with the holes you drilled into your house. Seal off the vinyl siding and the holes you just made on your wall using a caulk gun filled with white caulk. Securely attach your window planter box to the house using galvanized hex-head lag screws.
There are a wide variety of planter box ideas you can choose from and some of the best plant boxes you can make on your own include:
Elevated planter boxGalvanized planter boxRailing planter box Deck planter boxes and patio planter boxes for that extra curb appeal on your deck and patioLong planter box that can run along the entire stretch of your garden or even the sides of your houseVegetable planter box if you’re into edible gardening Pallet planter box if you’re looking for something a lot cheaper and easier to build Square planter boxes if you want to have that luscious plants but don’t want to take much spaceBalcony planter box that you can also turn into a herb planter box if you want to do some planting but currently live in high-rise buildingsConcrete planter box that is perfect if you’re looking for a more durable option Fence planter boxes if you feel like your fence needs some sprucing up or if you’re trying to start your own vertical garden
If you’re looking for an easy way to build a planter box for your windows, then the tutorial we included in this blog post will best suit you.
It is a simple project that doesn’t take much time or effort, but can be done with tools and materials easily found at any home improvement store.
When choosing the depth of your window planter box, there are several factors to consider.
For example, you’ll need to consider the type and size of plants you’re planning to put in it. If you want a flower that has a deep root structure and needs more space, then you’ll need a deeper window planter box to accommodate it.
You’ll also have to consider the size of your window and if having a bigger wooden planting box with a bigger capacity won’t break your window sill.
You can definitely save some money by building your own cedar planter boxes than buying a home depot planter box. The exact amount you’ll save depends on the materials you choose.
The other benefit is that building your own box planter gives you a deeper connection with the plants you grow in it. You can tailor it to fit your space, customize it to suit your taste, and show off your handy work to guests and neighbors.
We have a tutorial above that shows you the step-by-step guide on how to make simple wooden boxes for plants.
To ensure that your plants have the best chance at survival, you should add a layer of gravel or pebbles to the bottom of your wooden plant boxes. This will allow water to filter through the gravel and soil before passing through the drainage holes.
For better attachment and for your peace of mind, we recommend purchasing pre-made brackets for window boxes instead of creating your own.
The best way to hang flower planter boxes without drilling is to purchase hooks that you can attach to the box and then later hang on to your window.
This means that you can move your hanging planter box from window to window without needing to drill holes or use any other kind of permanent fixing.
First, make sure the method of attachment you use is appropriate to the weight and material you used for your window box. If it’s a fairly lightweight material (like plastic planter boxes and bamboo planter box), you can use things like hooks to attach it to your window sill.
However, if it’s a heavier material (say, a metal planter box made of cast iron), you’re going to want something a bit sturdier, like brackets that attach directly to the wall beneath the windowsill itself.
Second, be sure that whatever you use is rated for both the weight of your window planter box and the materials it will be holding on top of that.
For example, if your plant box holds 50 pounds, but then your plants add another 20 pounds on top of that, you’ll need to account for that 70-pound total in your choice of hooks or brackets.
Third, you’ll want to make sure that if you’re working with concrete or aluminum sills (which we don’t recommend) that you don’t use screws or bolts to attach your brackets—they won’t hold! Instead, use adhesive hooks and let them dry overnight before attaching your window box planter.
Now you know how to build a planter box of your own!
This project is as easy as it gets, and it’s a great way to add some life to your home.
You can even make a few of these wood planter boxes and give them as gifts—or maybe grow a little herb garden while you’re at it.
The possibilities are endless.
Gisele Bundchen's contemporary twist on this emerging design trend is the talking point of her kitchen
Zendaya taps into the subtle power of this accessory to ensure her neutral living room is never boring
Amazon has become a go-to for chic home decor – here’s what we’re shopping from the 2024 Spring Sale
This designer's 'every seat needs a surface' rule has changed my living room layout forever – here's what I mean
5 designer Amazon storefronts that make shopping for stylish homeware so much easier
Joanna Gaines' 'mesmerizing' garden is the perfect example of how to grow cut spring flowers at home
Tan France opts for this stabilizing color palette to 'ground' his guest cottage, experts say
Shark's St Patrick's Day sale is here - and you can save $100s on vacuums and air purifiers
Matthew and Camila McConaughey's raw cabinets possess a texture and warmth that's replicable in our kitchens
10 Ways to Upcycle an Old Dresser
20 Creative Ways To Decorate Your Light Switches
DIY Hoop Display Board
DIY Hanging Mail Organizer
25 Of The Best DIY Easter Decorations
How To Repurpose Concrete Blocks – Awesome DIY Projects To Try
10 DIY Vases and Planters
14 Inspiring DIY Bar Cart Designs And Makeovers
10 Easy Mirror DIYs For Your Home!
10 Budget-Friendly Entryway Makeovers For A Great First Impression
 zpostcode
  Recruit
  weather
  mreligion
  Yellowpages
  sport
sport  constellation
  shopping
  name
name  game
game  directory
  literature
  Word
Word  tour
tour  furnish
  Lottery
  tftnews
  lyrics
  News
News  digital
  car
car  dir
dir  Edu
Edu  Finance